Source Code: https://github.com/dings-things/coffee_pal
Purpose
Great cultures make great organizations — not just getting things done, but doing them well. Good culture enhances productivity and quality alike.
I created “CoffeePal” with the idea of helping people stuck on problems or simply wanting a quick small talk boost. The name reflects its purpose: your “coffee pal” during the workday.
Before Development
The app needed to be easy and fast, seamlessly matching users via our internal Slack tool.
To understand the interaction flow, I started with Slack Workflow.
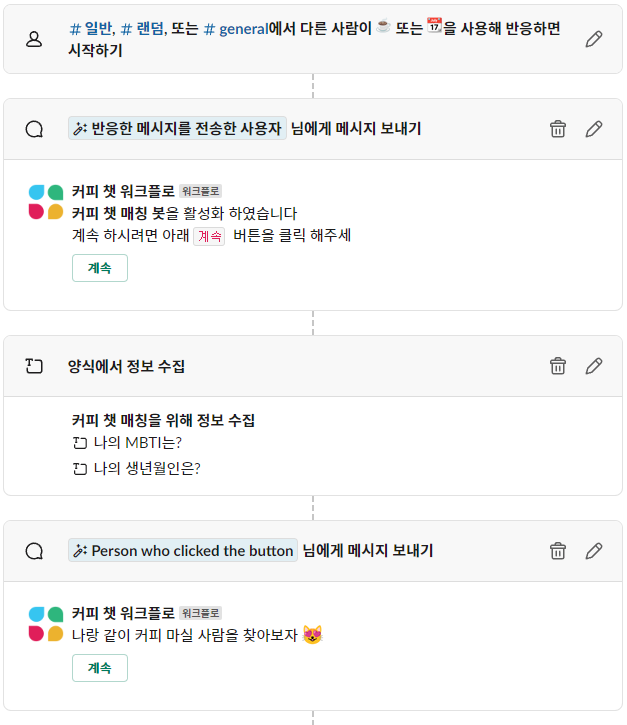
Create a Trigger Point
For testing, I used a:coffee:emoji reaction to initiate the workflow.Activate Workflow
A message is sent to the reacting user to confirm whether they want to start a coffee chat.Collect User Information via Form
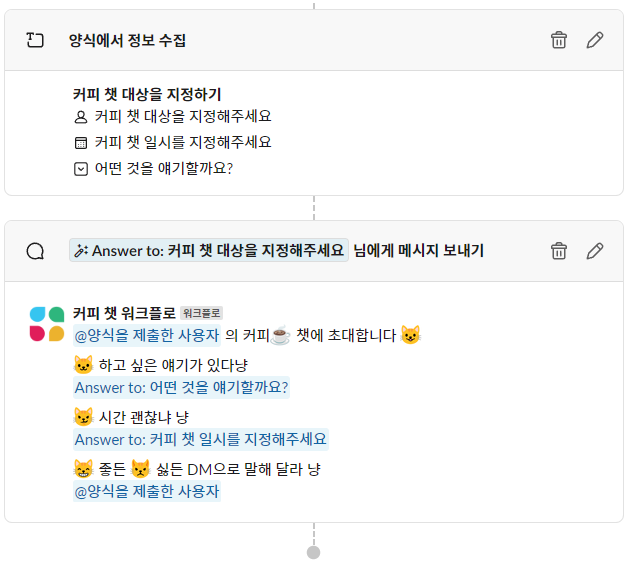
For personalization, users can optionally input their MBTI and birthday.Set Target, Time, and Topic
Define the coffee partner, schedule, and discussion topic ahead of time.Send Invitation Message to Partner
Using the collected data, send an invitation message to the designated partner.
I used Slack Workflow for the first time and found the UI clean and intuitive.
However, it felt more like a one-way communication than true interaction. So, I decided to expand it into a full Slack app.
It felt like being force-fed food I didn’t want…

Requirements
Match users based on pre-saved profile data
- Trigger matching after personal data is submitted
Secure compute resources to handle app interactions
- Internal Server
- Firewall complexity
- Fast response via socket communication
- AWS Lambda
- Free under Free Tier
- Serverless
- Can connect with API Gateway
- Consider future cost after Free Tier
- Internal Server
Intuitive UI for users at a glance
- Use Slack Block Kit
Implementation
Using Lambda
- Create Slack App
- Set up Lambda
- Configure Socket Mode
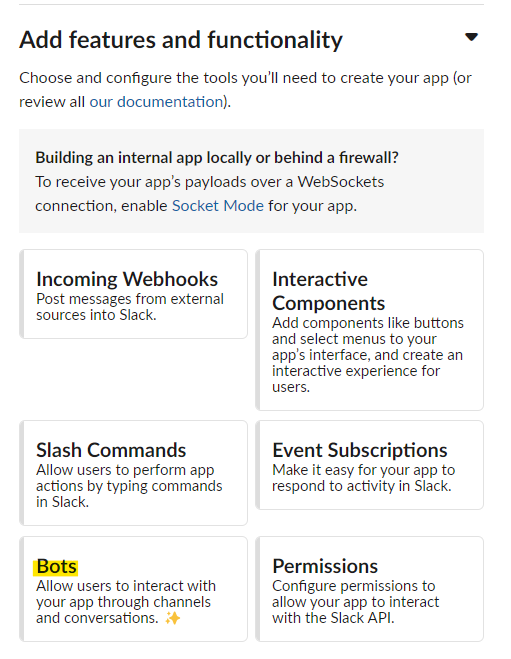
Step 1: Create Slack App
Go to Slack API and create a new app
Step 2: Click From scratch
Step 3: Choose workspace and name
Step 4: Set bot for user interaction

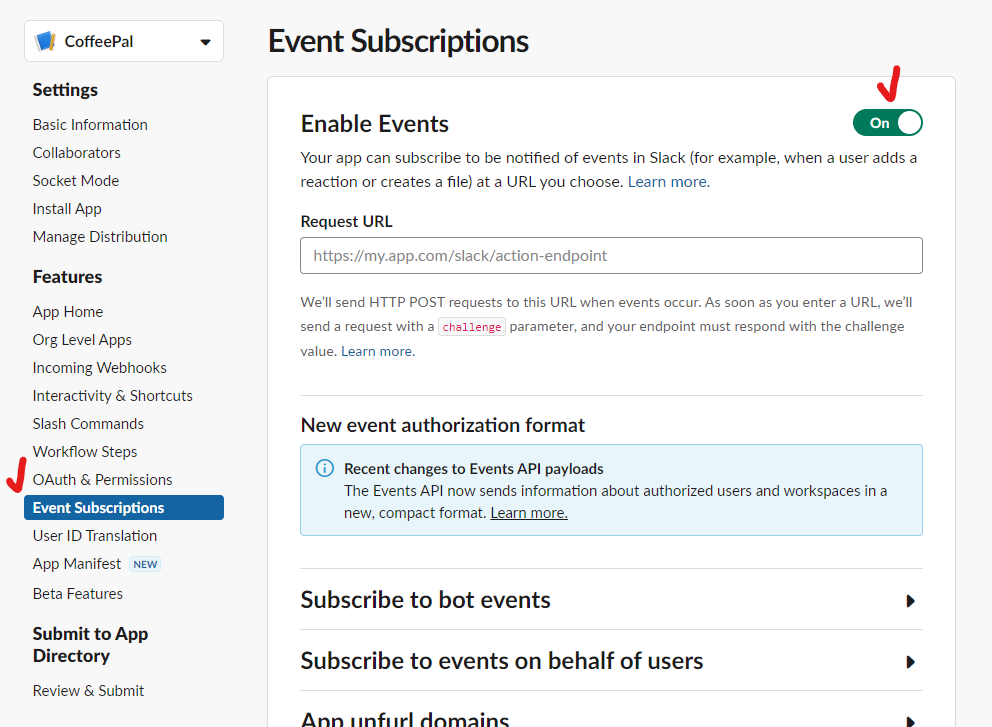
Step 5: Enable events

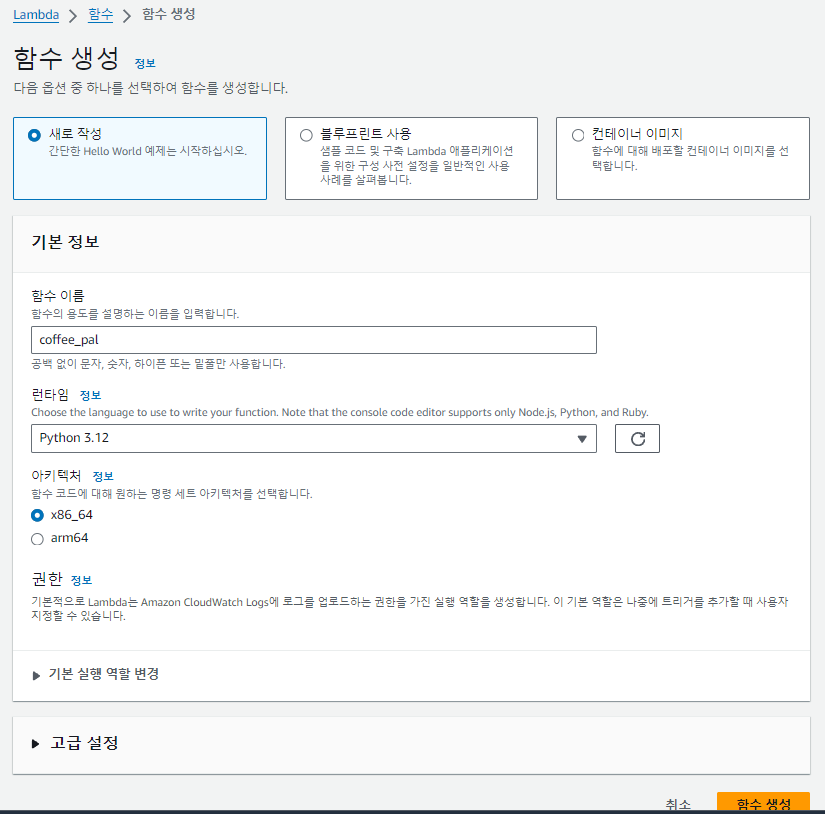
Lambda Step 1: Go to Lambda Console

Lambda Step 2: Configure function, runtime, architecture
Lambda Step 3: Set up API Gateway
API Gateway routes HTTP requests to Lambda — essential to integrate Slack Events API with Lambda.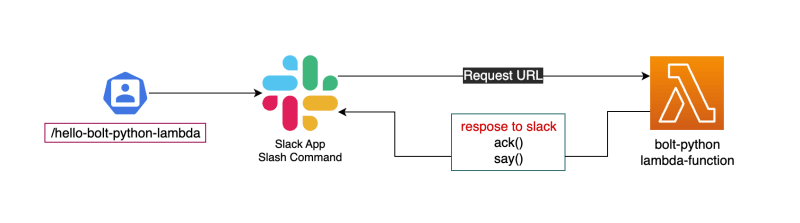
But then I asked myself… If we already have a server, why use Lambda? Wouldn’t not using it be wasteful?
So I decided to use our spare dev server and implement it via socket mode.
Socket Mode Configuration
What is Socket Mode?
Instead of sending payloads to public HTTP endpoints, Slack uses a WebSocket connection to deliver app interactions and events.

Avoiding public endpoints means better security, and you don’t need to subscribe to each event individually.
Step 1: Generate App-Level Token
Grant permissions to a global token for Slack app control inside the server.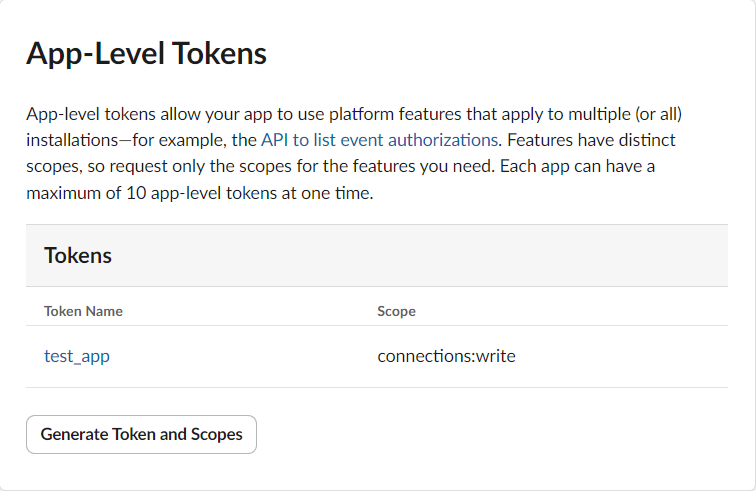
Step 2: Set Token Scope
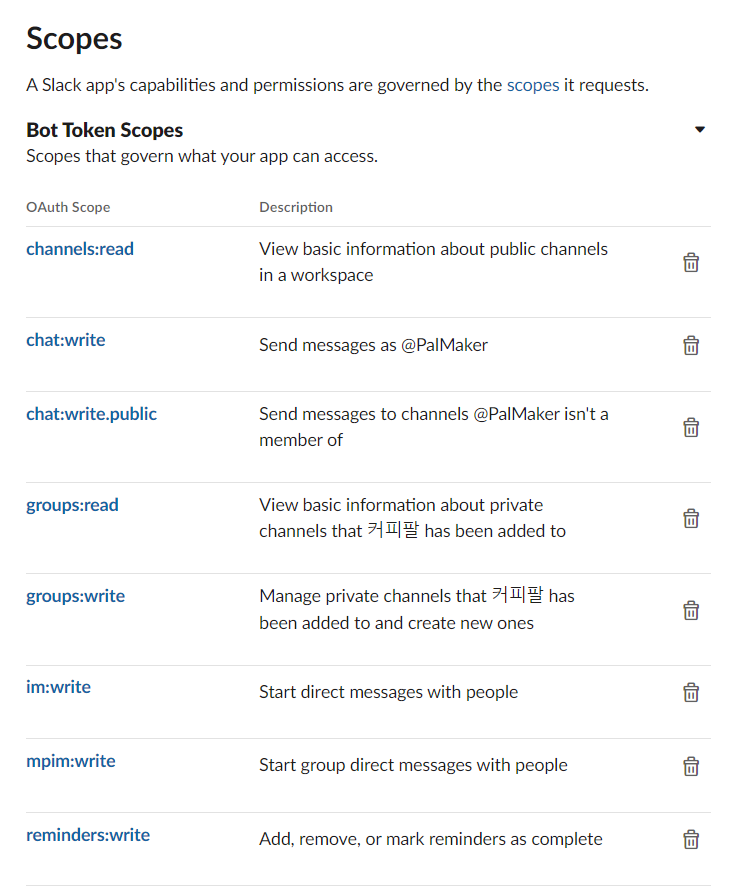
channels:read: Get user info from channelschat:write: Post messages to channelschat:write.public: Write to channels even if not invitedgroups:read: Access private channel infogroups:write: Write in private channelsim:write: Send DMsmpim:write: Send group DMsreminders:write: Set reminders
Development
Slack Bolt
A framework for building Slack apps, supporting languages like Node.js, Python, and JavaScript.
While you might consider skipping it… using Bolt avoids a lot of redundant work. Skipping it results in slower development and difficult maintenance.
Without Bolt:
from slack_sdk import WebClient
from slack_sdk.errors import SlackApiError
import os, json, base64, urllib.parse

def lambda_handler(event, context):
    bot_token = os.getenv('BOT_KEY')
    client = WebClient(token=bot_token)
    if event.get('isBase64Encoded', False):
        decoded_body = base64.b64decode(event['body']).decode('utf-8')
        event_body = urllib.parse.unquote_plus(decoded_body)[8:]
    else:
        event_body = event['body']
    try:
        event_data = json.loads(event_body)
    except json.JSONDecodeError:
        return { 'statusCode': 400, 'body': json.dumps({'message': 'Invalid request'}) }

    event_type = event_data.get('event', {}).get('type')
    # handle event_type...
With Bolt:
app = App(token=settings.SLACK_BOT_TOKEN)

@app.event("app_home_opened")
def handle_home(event, client: WebClient = None):
    ...

@app.action("suggest_coffee_chat_button")
def handle_chat_button(ack, body, client: WebClient = None):
    ...
Bolt simplifies:
- Auth
- Routing by event/action/view
- Middleware chaining
Block Kit
Block Kit is at the heart of Slack app UI design.
Each visual unit is a “block”. You compose a full view by stacking them.
HOME_VIEW = {
  "type": "home",
  "blocks": [
    ...
  ]
}
HOME layout
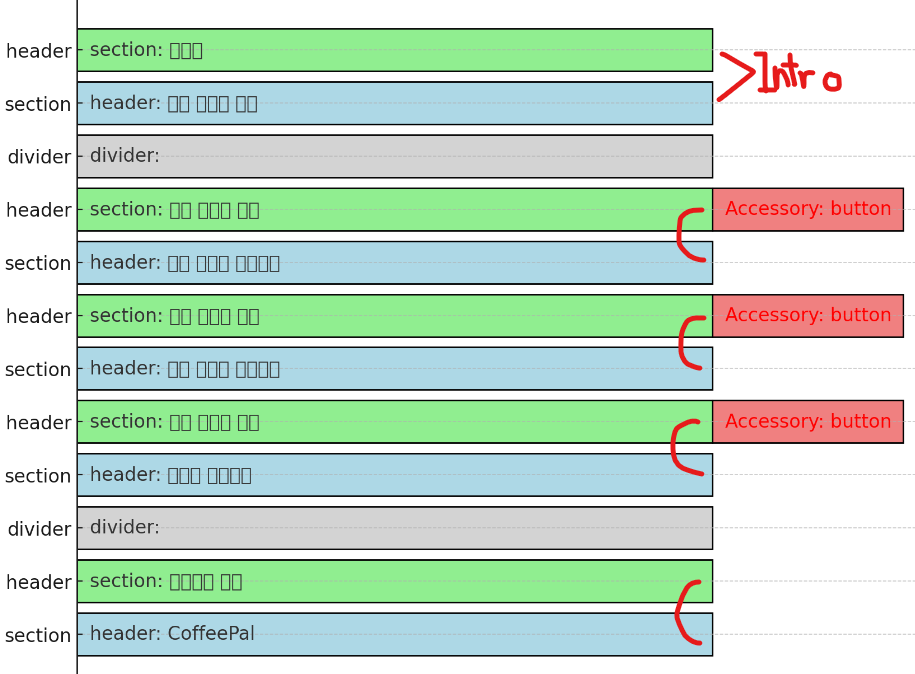
Horizontal Section
Vertical Section
Input
Slack API is stateless. Every request is isolated, so inputs are critical for maintaining interaction context.

Even if the server disconnects, the state can be restored based on input fields.
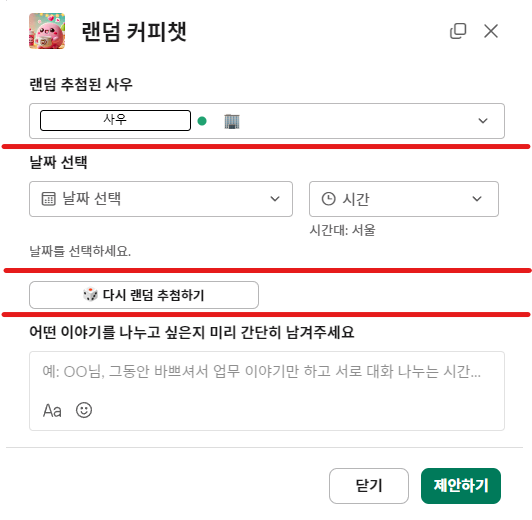
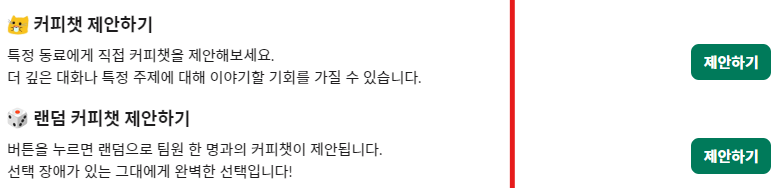
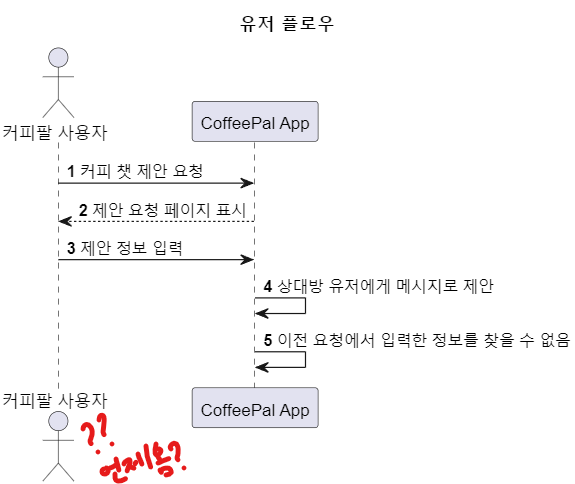
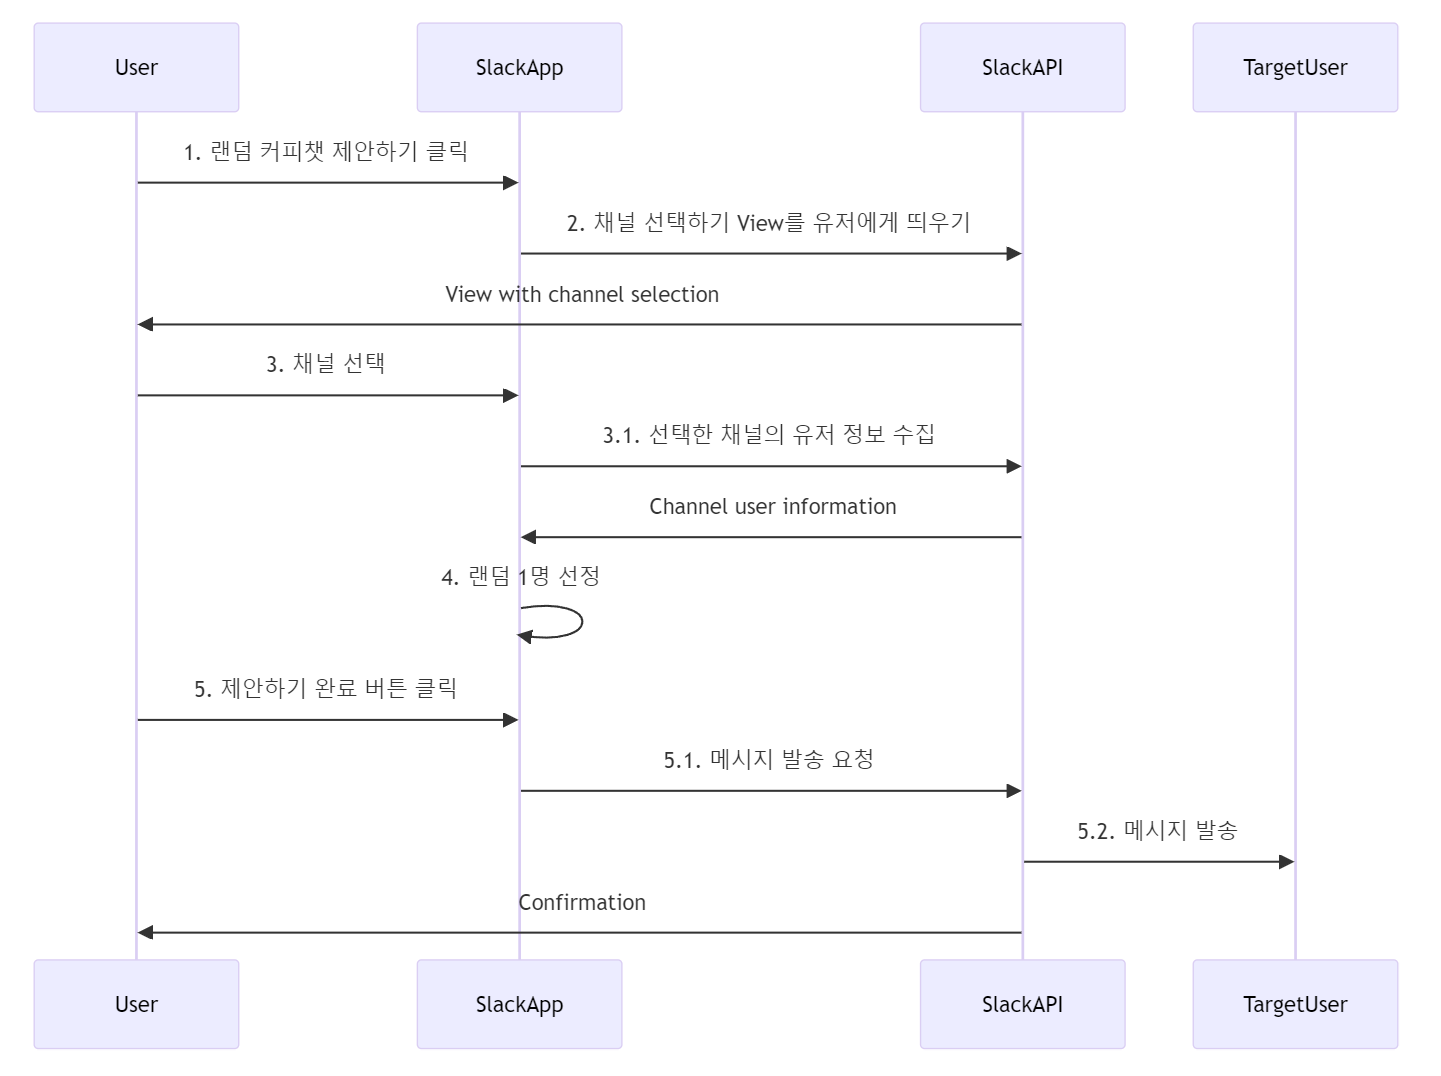
Random Coffee Chat example
Improvements
- Use Slack DataStore for stateful user data with TTLs
- Integrate HR info (rank/age/role) to personalize matches
- Improve UI for clarity and friendliness
- Add CI/CD and infra for production usage
Final Thoughts
As a developer, I resonate with the Ubuntu philosophy:
“I am because we are.”
Fostering collaboration is just as important as individual contribution.
That’s why I built CoffeePal ☕

If you hit technical roadblocks or need an ice-breaker for teamwork, consider building your own Slack bot!